

Optimize publication search to populate your profile
- Charlotte Surratt
- Robert A Scott (Unlicensed)
UGA Elements makes keeping your records up to date easier by downloading publications from online databases. The Elements Synchronizer searches for publications you have authored or co-authored only in online databases that UGA has license to use and so it will likely not find 100% of your publications ("false negatives"). Some disciplines are not well represented in the available databases, so users in those disciplines may not find many of their publications from the online search, but there are other ways to import publications. This guide focuses on how to optimize the Synchronizer, while other guides discuss import methods.
Also, as you can imagine, there may be other authors that share a similar name with you, and the Synchronizer may find publications that belong to them and not you ("false positives"). The Synchronizer allows you to optimize its search settings to better search the online databases for your specific publications.
Because the Synchronizer results are not perfect, you will be asked to claim your publications and reject publications that are not yours. Elements sends you an automatic email alerting you to new publications, which are kept in a "Pending" queue until you claim or reject them. When you login to Elements, you will see a notification about these in your "My Actions" panel on your Home page.
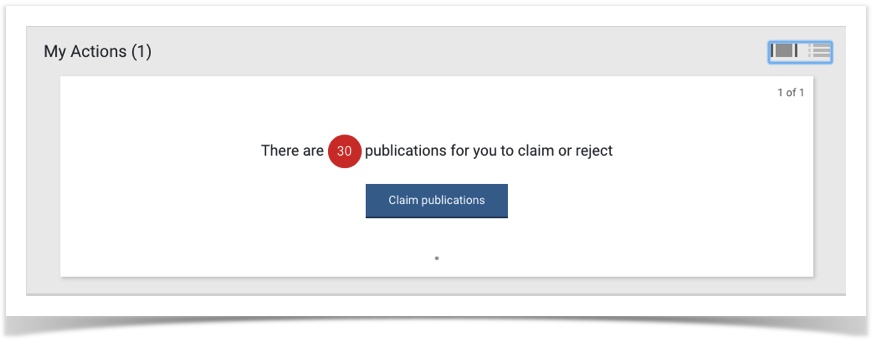
When you click the "Claim publications" button (or click the link in the email you receive), you are brought to your My publications page, where you will see three "folders" labeled Mine, Pending, Not Mine, each displaying the number of publications in that folder.
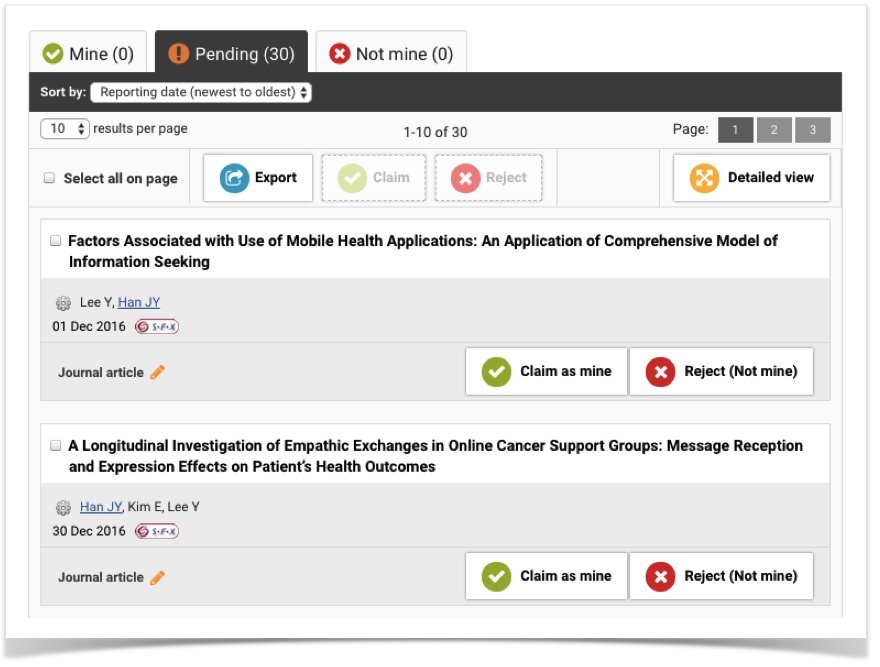
On this page, you can review these recommendations and Claim or Reject each publication, depending on authorship. You can do this one by one using the buttons associated with each one, or click checkboxes and use the buttons at the top.
Note that the importance of keeping your Rejected publications in that folder is that Elements uses them to recognize in its next search that those are not yours and therefore will not be offered again for claiming.
Basic Search Settings
When you are first added as a user to UGA Elements, basic search settings are created automatically and the Synchronizer is started. Seeing the My Actions "claim or reject" message indicates that these settings have been used and a search has returned some "hits". Regardless of whether the Synchronizer found too few or too many publications, you should consider adjusting some of these settings.
You can view your current search settings by selecting Data Source Search | Name-based search in the My Account menu under the Menu tab at the top of any of your Elements pages. On the resulting page, you first see the results of the most recent searches, then in the Name-based searches panel, you have access to a number of settings that apply to your searches; the most important ones are:
- Name variants: (There must be at least one entry here.) By default, this consists of your surname, followed by your first initial (many online databases only provide author first initials). If you have a middle name, it is likely you will want to use both first and middle initials in your searches; add that name and remove the original. If you use a different name for publishing (or ever have), you should add that name to this setting. Any publication with an author that matches any of these variants will be selected.
- Addresses: You may see 'georgia' in this field; this occurs automatically if Elements decides you have a common surname. This implies that publications must have an author affiliation containing the word 'georgia' to be selected. If you have also published from a different affiliation, you should add that address to this list. Then any publications with your name and this other affiliation will also be selected. (Note that any author affiliation with one of these addresses will cause a publication to be selected.)
- Start date: You may wish to use this to limit false positives. Entering the first year you have published anything will eliminate any older publications by authors who share your name.
When you make any changes to these settings, be sure to scroll to the bottom of the page to click the Save button. When you do that, you are queued up for new searches. There is an automatic 30-min delay in case you want to change any other options before the search executes.
If this next search seems optimized (not too many "false negatives" nor "false positives"), then you are done. Since it is likely that this will not find 100% of your publications, you may also want to import missing ones using one or more of those guides.
Missing publications? Broaden your search
The major reasons for not finding all your publications are:
- You publish in a discipline that is not well covered by the available online databases (e.g., humanities, fine arts). In this case, you will probably have to use the import guides.
- You have not listed all your possible Name variants that may appear in publication metadata; add some more that you may have used in publications.
- You have not listed all the Addresses from which you have published, or the address you listed is not matching affiliations in publication metadata. (For example, if you specified 'university of georgia', not all databases specify our institution that way; use something that is likely to be in any affiliation metadata, like 'georgia'. Other examples might be 'caltech', 'furman', 'berkeley'.) Add more addresses or change their specification.
Too many publications ("false positives")? Narrow your search
This is the more common occurrence and is usually caused by your name being shared by many other authors. The solution to this is referred to as "name disambiguation". If your "My Actions" panel on your Elements home page shows that you have several hundred (or thousand) publications to review, try some of the tricks suggested here before trying to wade through all of them.
Your identifiers
Beyond the Search settings already discussed, Elements can use several other disambiguation tools to identify you uniquely as the publication author. These include email address and several third-party person identifiers (ORCiD ID, Researcher ID, ArXiv author ID, SSRN author ID, etc.). This can work only if one of these identifiers is contained in the publication metadata of your publications. Since this cannot be assumed, identifying yourself in this way does not actually narrow your search; rather it can automatically claim publications that must be yours, thus reducing the number of publications you are asked to claim or reject.
You manage these identifiers on a different screen: choosing Data Source Search | Automatic claiming in the My Account menu under the Menu tab at the top of any of your Elements pages. However, you often encounter these identifiers when you go to your My publications page to claim or reject publications found by the Synchronizer.

The Synchronizer identifies email addresses and unique identifiers in the metadata of publications that match your Search settings. Now it is asking you to tell it whether these in fact identify you (or if they belong to other authors). Notice that you can make any of three choices (Yes, No, Ignore). These are key to the effective use of these identifiers.
Clicking the link "Manage all identities" takes you to the Automatic publication claiming page, where these same identifiers are repeated. Below these are another three folders containing your identifier management decisions.
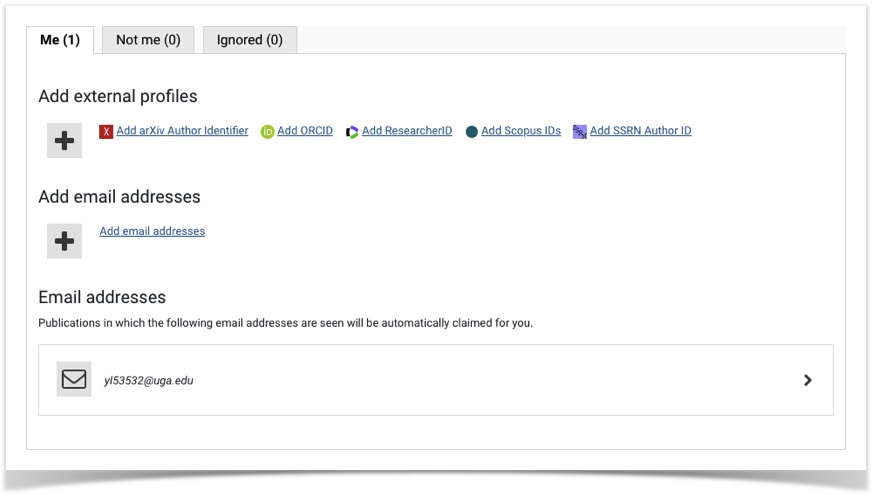
Normally, your MyID-based UGA email address has already been entered into your "Me" folder. Identifiers in this folder that are found by the Synchronizer associated with publications are automatically claimed for you (they bypass the Pending folder). If you use (or have used) another email address that could be associated with your publications, you should add it (Add email addresses link).
If you know that you have any third-party identifiers, then use the Add external profiles section to connect your Elements profile to all of those, placing them in your "Me" folder. (You should also be sure to always submit one or more of these unique identifiers when you submit a manuscript for publication or a proposal for review.)
"Not your" identifiers
Many (likely most) of the unique identifiers (email addresses or third-party identifiers) that the Synchronizer finds in publication metadata will belong to other authors. If you carefully mark each of these as "Not Me", then any publications found with these identifiers will automatically be Rejected and not offered to you for claiming, thus effectively narrowing your search results.
The links next to the icons for these third-party identifiers (or associated with other email addresses) take you to the third-party web sites to view these profiles; this allows you to confirm that this is not about you. For example the ORCiD link on the above example takes you to this ORCiD profile, which does not belong to you.
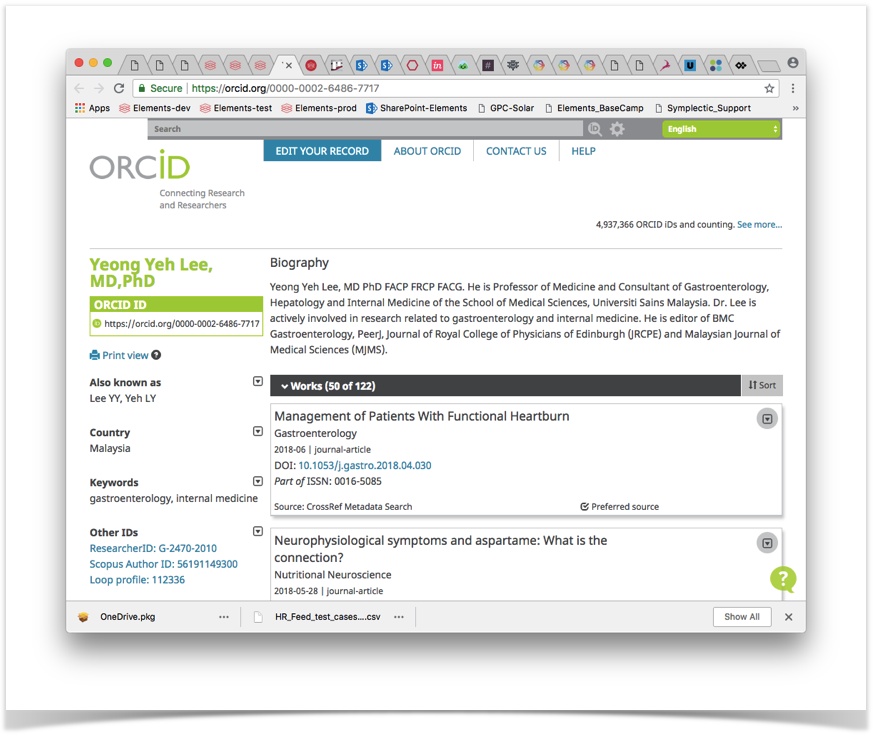
Thus, in this case, you would click on the "No" button associated with this ID, then confirm the popup, placing this ID in the "Not Me" folder; any time this ID is seen, the publication will automatically be rejected.
If you have a particularly common surname, your searches could return up to 50 or so of these third-party identifiers, all but one or two of which are clearly not you. Answering "No" to all of those will significantly reduce the number of "false positives", making your task of claiming or rejecting the remaining publications much easier.
Synchronizer searches will display only 10 possible identifiers at once, so you will have to go through a few rounds of identifying these "Not Me" authors. Once you have said "No" to the first 10 (or a subset), click your Home menu again, then on your home page, click Claim publications again; the next 10 possible identifiers will display. Keep going until you have responded to each suggestion.
Starting over
After you have made significant changes to either Search settings or Automatic publication claiming, you may wish to "start over". At the bottom of your home page, you should have a link called "Reset (clear) pending publications". Clicking this link will remove all the publications in your Pending folder and queue you for a new search (again with a 30-min delay). Hopefully, you will now have a manageable number of publications to claim or reject.
Last resort
In rare circumstances, even after going through all these tricks, you will still end up with several hundred publications to claim or reject. In these circumstances, you have three other Search settings available. (Since these will severely narrow your search results, use these with caution.) Again, you can get to these by selecting Data Source Search | Name-based search in the My Account menu under the Menu tab at the top of any of your Elements pages.
- Keywords: Specifying one or more keywords restricts the Synchronizer to finding only publications that match those keywords. So, if your publications are in narrowly defined fields or disciplines, you may be able to use keywords to eliminate many of the "false positives" from your Synchronizer results.
- Journals: If your publications always appear in one or a few journals, then you can limit the search to specific journals by using this setting. This can be quite tricky as you have to know how databases abbreviate the journal titles in their metadata so that a match is found. If you know enough about your publication metadata to know that, you may wish to use the following option.
- Specific article IDs: Databases use unique identifiers specific to those databases for every article. If you have found your article independent of Elements in one of the Synchronizer-used databases (see dropdown under Online database:), then you can probably find the identifier and use that to conduct a search. (Note that nearly all publications also have a generic digital object identifier (DOI) that can be used through the manual input method of adding publications.)
Next steps
These synchronizer searches will not find 100% of publications that you would put on your CV. Short of manual entry of other publications, there are other shortcuts to importing publications.
If you use a citation manager (Ex. Endnote, Mendeley, RefWorks or Zotero) go to How to import publications from citation manager applications. Otherwise, go to How to import publications from Third Party sources.